How to remove a printer you no longer use in Windows
27 March 2025
In this article, we will show you how to remove a printer in Windows 10 quickly and easily.
To remove a printer from Windows 10, follow these steps:
- Locate the “Magnifying Glass” icon on your system’s taskbar. A screenshot of this application in Windows 10 and 11 is attached:

- Click on this application and type “Printers and Scanners”. Then select this option and click “Open“.

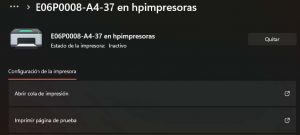
- From the list of devices shown by the system, select the printer you want to remove and click “Remove device”. In systems with Windows 11, you will need to click the “Remove” button.

- You will be asked to confirm the removal of the printer. Click “Yes” to confirm.
The printer will be removed from the list of installed printers on your system. If you wish to reinstall it in the future, you will need to reconnect it to the computer and follow the corresponding installation steps.
| Note:
It is important to note that removing a printer does not uninstall the printer software or remove its drivers. If you want to completely remove the printer from your system, you will need to uninstall the software from the “Add or Remove Programs” menu. |